Picking an Item
An order detail is an item to be picked in the picking order. The details are displayed in the Details tab. Each detail in the order is loaded one at a time, by form. You are able to view the item detail or pick it, by item number, at the Details tab. Tap the Details tab to bring this portion of the form to the front.
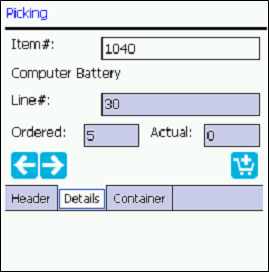
- Item No.: the item number that belongs to the first line item in the order that needs to be picked is automatically entered in this field. If you want to pick a different item in this order, you may enter or scan it into this field.
- Line No.: the line number for this item detail is automatically entered in this field.
- Ordered: the ordered quantity for this line item is automatically entered in this field.
- Actual: the pick quantity for this line item is automatically entered in this field.
- To view the previous or next line item for this order, tap the left or right arrow icon, respectively
 to load the previous line or the next line, respectively.
How to Pick an Item
- From the Details tab, for a line item, tap the
 Pick icon to reach the Pick form for this item detail.
Note: If the ordered quantity has not been fully picked, you are able to complete the item pick from the Pick form. The actual pick quantity cannot exceed the ordered quantity.
- The Pick form for this item detail appears.
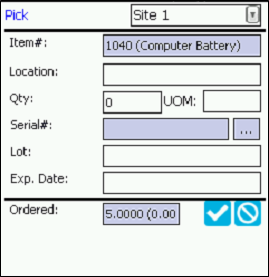
- Site: if the logged-in user has access to more than one site in the default division, select the site from which the item will be picked.
- Item #: the item number for this detail is automatically placed in this field.
- Location: enter the pick location in this field.
- Qty: enter the pick quantity in this field. If using the default pick quantity orders preference setting, this quantity will automatically be placed in this field; see "User Preferences" for more information.
- UOM/Serial #/Lot/Expiration Date: When a unit of measure, a lot, a serial number, or an expiration date is required for an item, this information must be entered upon the item pick. When an item is serialized, the serial number for the item is entered at the Enter Serial Numbers form; see "Serialized Items" for more information.
- RFID Tag Number: When the item uses RFID it will use an RFID tag number (optional). If the item contains an RFID tag number, the tag number will automatically appear in the RFID tag number field. When an item contains an RFID tag number, its quantity must be 1.
- Ordered: the total item pick quantity is entered in this field.
- To pick this item, tap the
 Save icon.

- RF Mode: The item is immediately picked and relieved from inventory.
- Batch Mode: The item is picked and relieved from inventory and stored as collected data. When uploaded and processed into the main application, the item will be picked and relieved from inventory.
- You are returned to the Picking form\Details tab.
- The next item in this order is automatically loaded.

- If all items have been fully picked, the first line item is loaded and shows the full pick quantity in the Actual field.
- If an additional line item is ready to be picked, it is automatically loaded in the Details tab. Repeat steps 1-11 to pick this item. Continue to pick items until you are finished.
- RF Mode: When all items in the order are picked, the order status is automatically updated to "Closed."
- Batch Mode: The order is updated in the batch database to "Closed." When the collected data is uploaded to the main application and processed into the database, the order status in the main application will be updated to "Closed."